
There are several ways to add people to Contacts:
- New contact — add someone manually with their details.
- Import — upload a CSV to add many contacts at once.
- Automatically — a contact is created whenever someone messages you on a connected channel.
- From search — when a search finds nobody, create the contact and open a conversation with them in one go (guide).
Watch the walkthrough
1. Prepare your contact list
Before you import, put your contacts in a spreadsheet, such as Google Sheets or Excel. Make the first row your column names, for example Name, Phone and Location. Each row below it is one contact. Write every phone number with its country code, in international format, for example +60123456789. When your list is ready, save or download it as a CSV or Excel (.xlsx) file. That’s the file you upload in the next step.
Working in Excel? Two things keep your list clean:
- Upload the Excel (.xlsx) file itself. When Excel saves a CSV, it can shorten long phone numbers to something like 6.01E+10 and drop the last digits. The .xlsx file keeps the full numbers. If you need a CSV, set the phone column to Text before you type or paste the numbers.
- End the list at your last contact. Delete any rows below it, such as a label copied down to the bottom of the sheet.
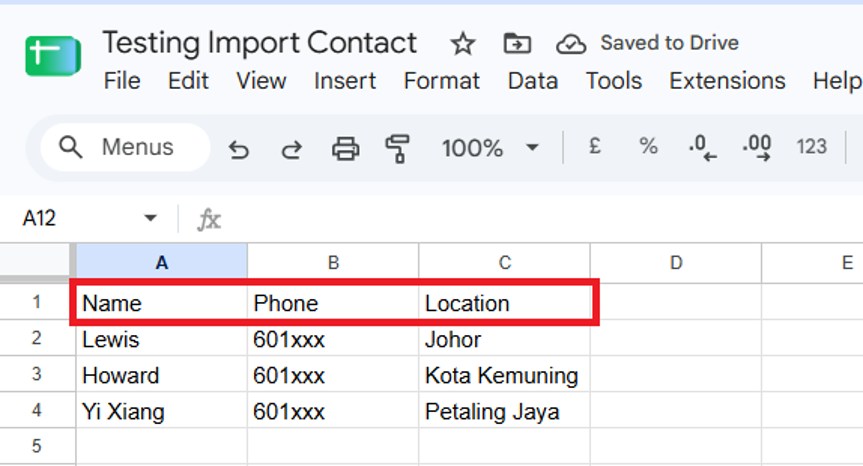
2. Open Import contacts
In Mampu AI, click Contacts in the left menu, then All Contacts just below it. At the top right of the contacts list, click the three-dot icon next to the Message button. From the menu, choose Import contacts, then pick the file you saved.
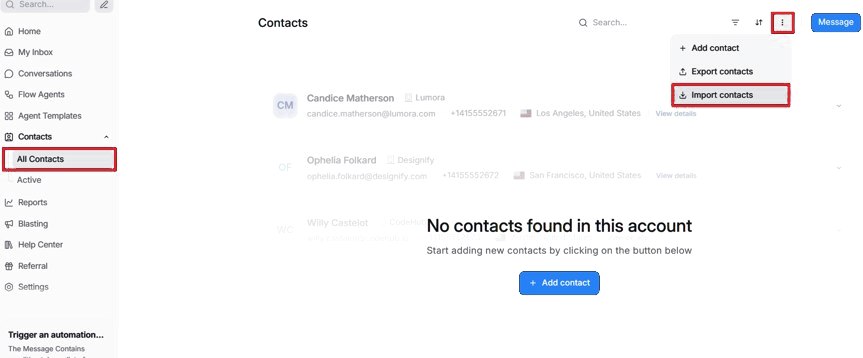
3. Match each column
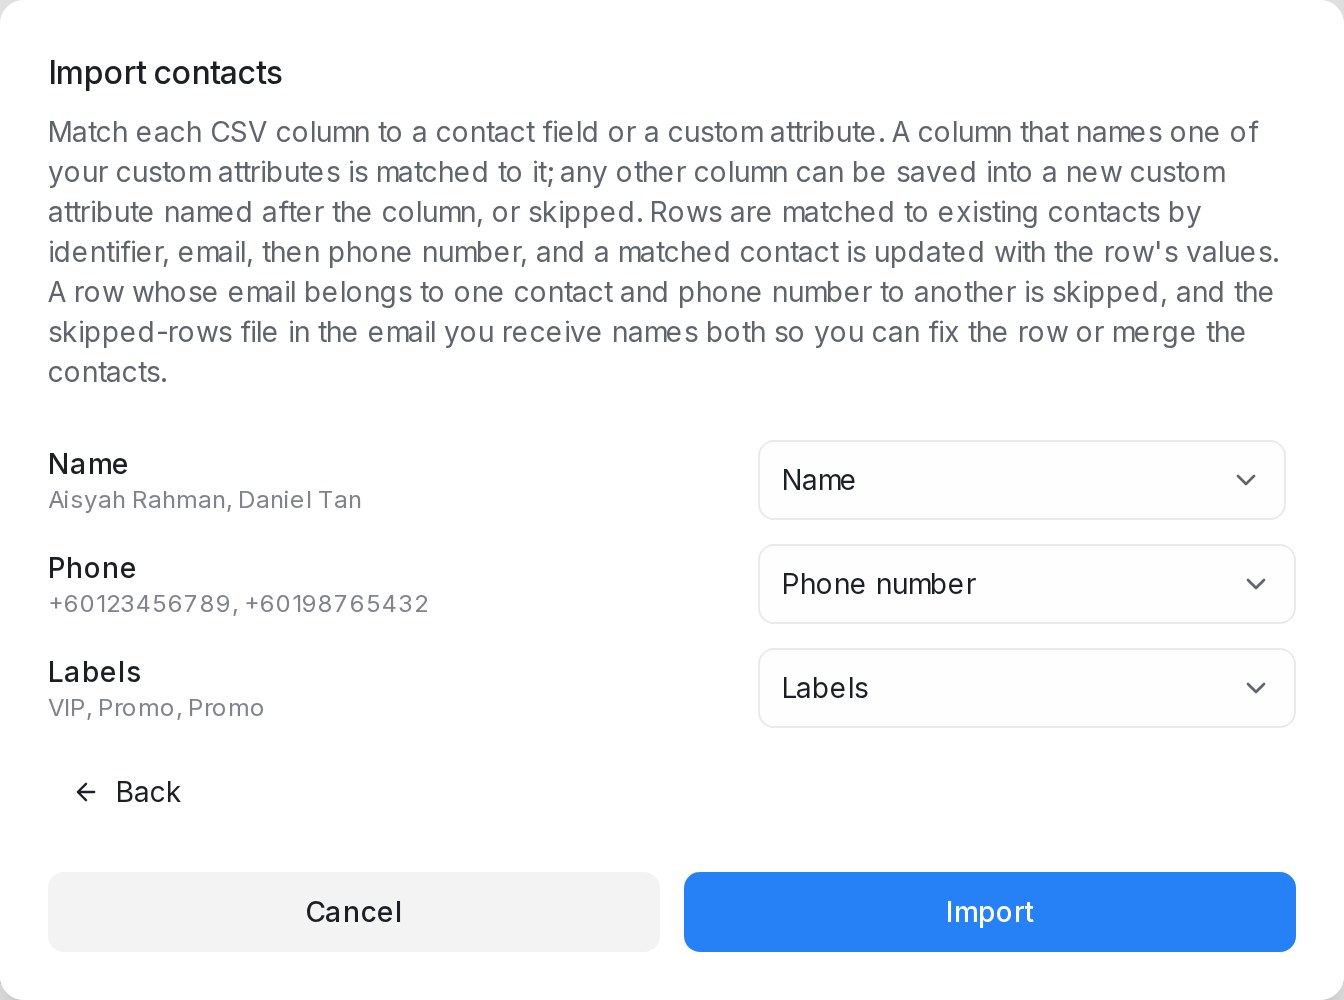
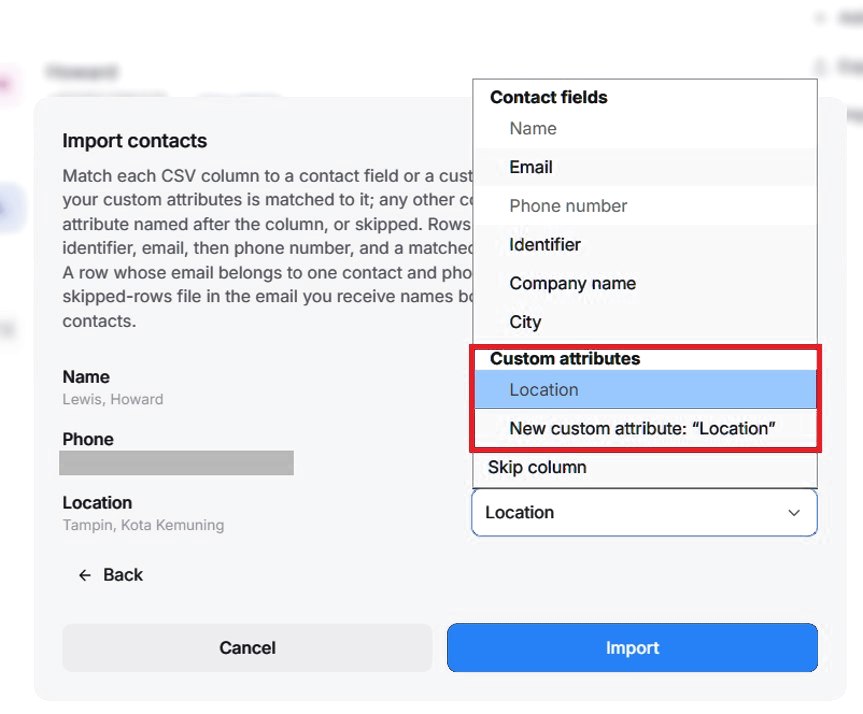
The Import contacts window lists every column from your file, with a few sample values under each so you can tell them apart. For each column, open the dropdown on the right and choose where its values should go:
- A contact field: Name, Email, Phone number, WhatsApp username, Identifier, Company name, City or Labels.
- One of your custom attributes, listed by name under Custom attributes. A column whose name matches an attribute is picked for you, like Location here.
- New custom attribute, named after the column, when no attribute matches. It is created when you import.
- Skip column to leave the column out.
Labelling contacts as you import
To label contacts as you import them, add a column called Labels (Label or Tags works too). It is matched to Labels for you. Write each contact’s labels in that column, with a comma between them when there are several. They are matched to the labels your account already has, whether you use capitals or not. A row with a label your account doesn’t have yet is skipped, so create the label first under Settings > Labels.
Labels from the file go on the contacts. To also start automations that react to a label being added, such as one that fills AI attributes, tick Also add the labels to each contact’s latest conversation. The box appears once a column is matched to Labels. Each contact’s most recent conversation then gets the same labels, and your label automations run for it. The conversation shows who added the label. A contact with no conversation gets the contact label only, and no conversation is created.
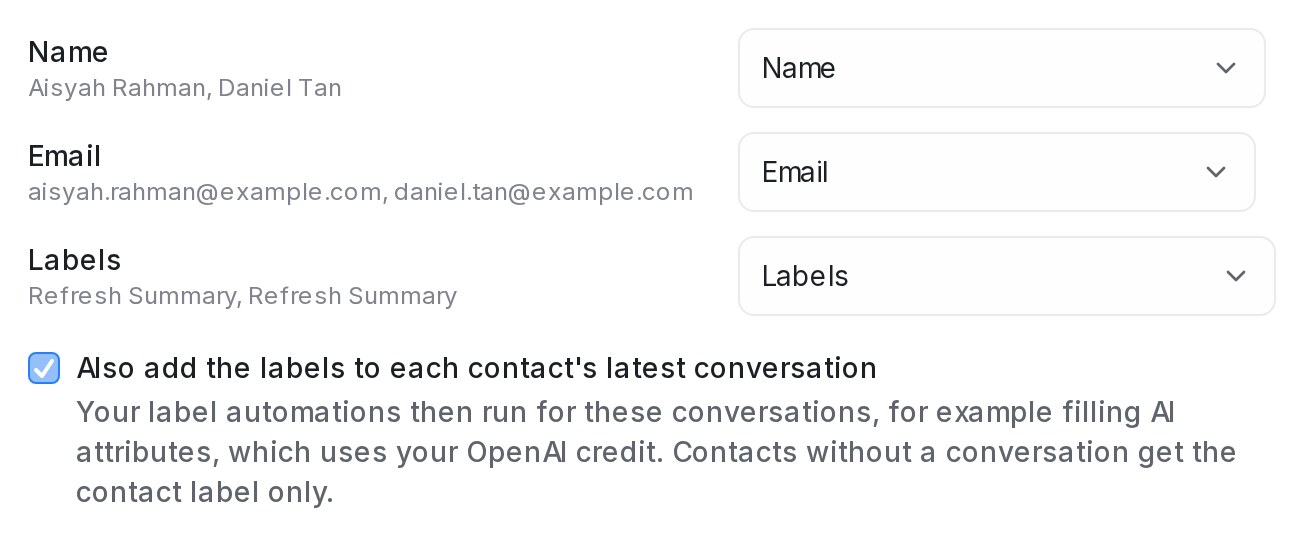
If an automation fills AI attributes, each conversation uses your OpenAI credit, and a large import fills them over a while rather than all at once.
Some column names belong to built-in fields, such as Status or Created at. A column with one of these names starts on Skip column, because it can’t become a custom attribute.
Importing WhatsApp usernames
Some customers chat with you on WhatsApp by username and don’t share their phone number. To add them, put their usernames in a column called WhatsApp Username. It is matched to WhatsApp username for you. A leading @ is fine, and capitals don’t matter.
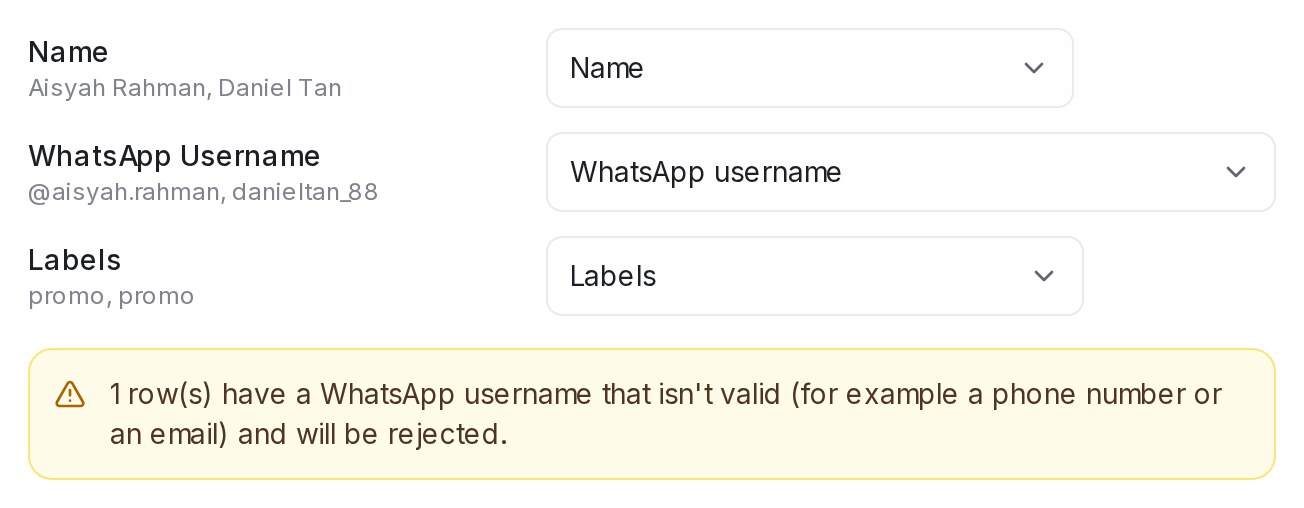
- A row needs only the username. Phone and email can stay empty.
- A contact who already has that username is updated, not added twice.
- A value that can’t be a WhatsApp username, such as a phone number or an email, gets the whole row skipped. The window warns you before you import.
- A contact with only a username can’t be messaged yet. When that person messages one of your WhatsApp numbers, their chat and the imported contact become one contact, keeping its labels and details. From then on, a WhatsApp API (WABA) blasting can reach them too.
4. Check and import
Look over the list once more before you click Import:
- Every column is matched to the right field.
- At least one of Email, Phone number, WhatsApp username or Identifier is matched. A row with none of these is skipped, because there would be no way to reach that person.
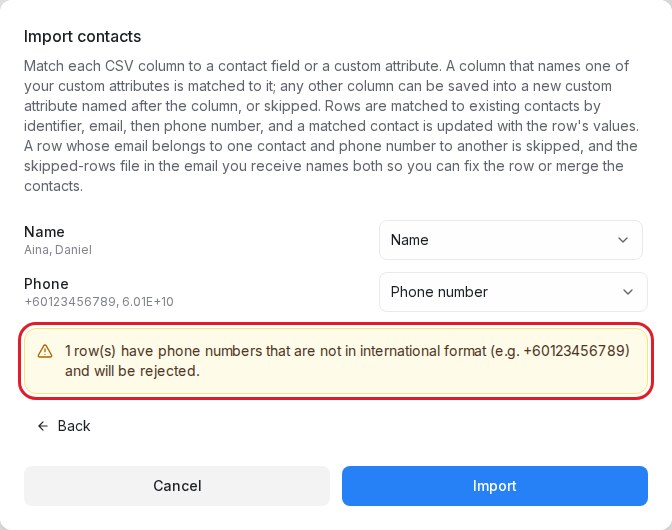
- Phone numbers are in international format. The window warns you about rows that aren’t.
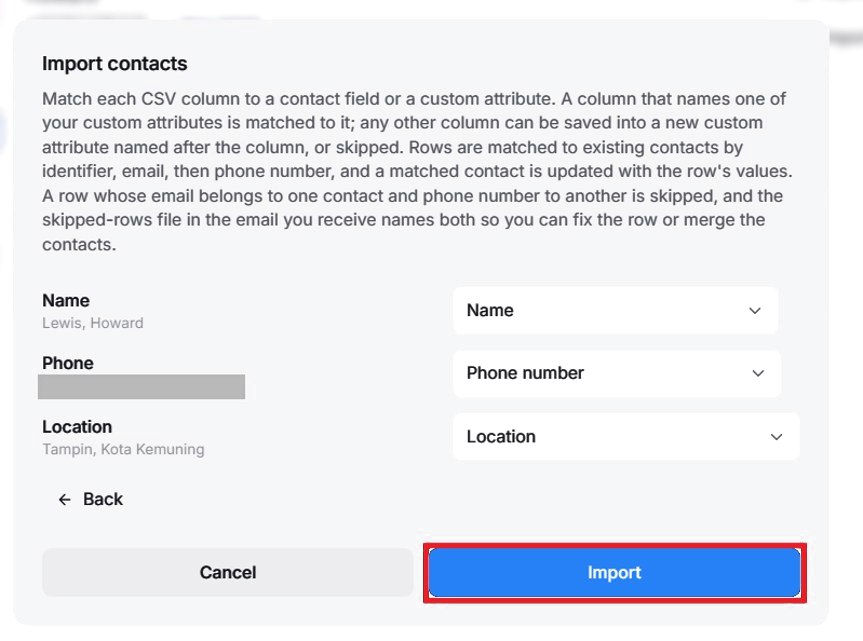
Then click Import. Already have some of these people in your contacts? They won’t be added twice. Mampu AI finds them by identifier first, then email, then phone number, then WhatsApp username, and updates them with the new details. If a row’s email belongs to one contact and its phone number to another, that row is skipped. The email you receive lists it, so you can fix the row or merge the two contacts.
5. Check the imported contacts
The import runs in the background, and you’ll get an email when it’s finished. It says how many contacts were imported and how many rows were skipped.
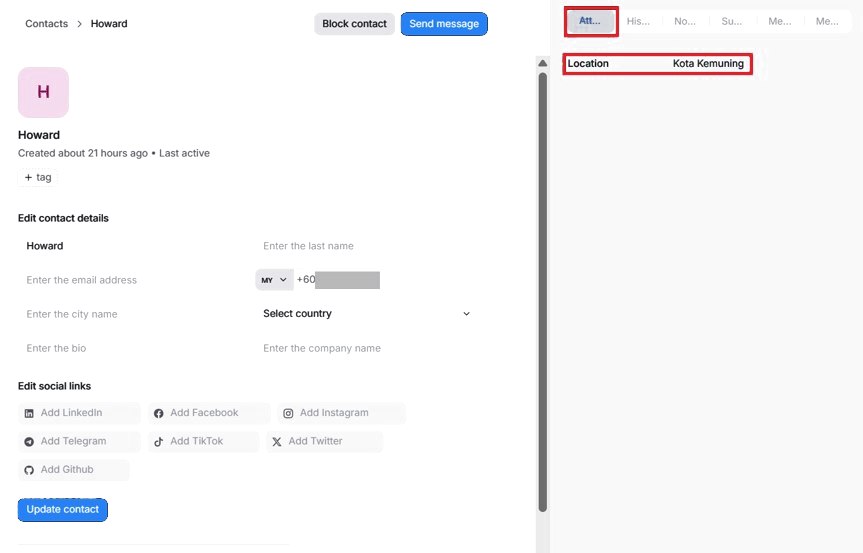
Go back to Contacts and click View details on any contact to check it. Values you imported into custom attributes, like Location, show on the Attributes tab on the right.
Want to message someone right away? Use Message to start a new conversation.
To find people by one of those attributes later, use Filter contacts; see Searching, filtering and segments.
6. Fix any skipped rows
If any rows were skipped, the email links to a file of those rows, with the reason next to each one:
- No contact details — the row has no email, phone number, identifier or WhatsApp username. Add one and import the row again.
- Not a valid WhatsApp username — the username column holds something else, such as a phone number or an email. Move it to its own column, or fix the username.
- Phone number was shortened by Excel — the phone looks like 6.01E+10, so the real number is lost. Upload the Excel (.xlsx) file instead, or set the phone column to Text and save the CSV again.
- Email and phone belong to two different contacts — fix the row, or merge the two contacts.
- Unknown labels — the row has a label your account doesn’t have yet. Create it under Settings > Labels, or fix the spelling.
You can often catch these before importing: the Import contacts window warns you about phone numbers that aren’t in international format, including ones Excel shortened.
When the skipped rows are fixed, import just those rows again. Contacts already imported are updated, not added twice.
Tip: to message everyone in a spreadsheet right away, upload it directly in a blasting instead — see Creating and scheduling a blasting.